Showing posts with label Bread. Show all posts

Saturday, January 29, 2011

Walnut Coffee Cake

  Cooking Light April 2006

Before I start on how to make this, I need to tell you to write down the ingredients and go get them. Because you will want to make this. this is amazing!

3/4 C brown sugar
1/3 C chopped walnuts
1 tsp ground cinnamon

mix those in a small bowl.

3 1/4 C flour
2 tsp baking soda
1 tsp baking powder
1/2 tsp salt

Combine flour, soda, powder and salt in a medium bowl.

1 1/2 C sugar
10 tbsp butter
3 eggs
1 tsp vanilla

cream sugar and buttah. add eggs and vanilla, mix well.

add flour mixture and 1 1/2 C buttermilk to butter mixture alternately, starting and finishing with flour.

Spoon half the batter into a greased bundt pan. sprinkle half of brown sugar mixture, and spoon the rest of the batter in the pan. sprinkle the rest of the brown sugar mixture.

Bake at 350 for 55 minutes or so. Cool in pan at least 10 minutes before inverting.

The verdict: wow. I mean, WOW. YUM. I want to make this every day but I don't trust myself that much. I would hoard it from the kids and eat it all before Dave gets home from work so he won't know I made it and be mad he didn't get any.

Dave's Raves: Good. Very good. I want more now.

KEEPER.


Monday, January 17, 2011

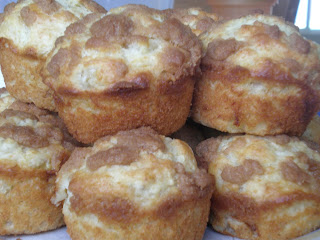
CL testing - Whole Grain Blackberry Spice Muffins

  Cooking Light Magazine Jan/Feb 2006

2 C all purpose flour
1 C oats
1 C brown sugar
1 1/2 tsp. baking powder
1/2 tsp. baking soda
1/2 tsp. salt
1/2 tsp. apple pie spice

Mix dry ingredients in large bowl. In a separate bowl, mix the following:

1 C skim milk
3 tbsp melted butter
1 tsp. vanilla
1 large egg

Add wet ingredients to dry ingredients and mix until barely mixed.

Then add 1 1/2 C chopped frozen blackberries. Stir gently and fill muffin cups 1/2 - 2/3 full. Bake at 400 for 14-17 minutes. Cool in muffin tins for 5 minutes and enjoy!

(makes 18; 177 calories each; 3g fat; 3.5g protein)

Verdict: The texture was really nice with the oats and the spices added a new dimension. The blackberries added a tart background. These muffins are NOT overly sweet, we found them just right. You could substitute any berry for these if you like. Raspberry, blueberry, etc. I've eaten 7 by myself so far today.

Dave's vote: SO good. Please make these again.


Friday, July 3, 2009

Banana Muffins with Streusel Topping

I was feeling lazy this morning about breakfast, and went to grab a muffin mix out of the cupboard. Unfortunately we didn't have any; but we did have some ripe bananas and so I decided to make them myself. Super yummy; and a great way to use those darn bananas.

1 3/4 c. flour
1/3 c. sugar
2 tsp. baking powder
1/4 tsp. salt
1 beaten egg
1/2 c. milk
1/4 c. cooking oil
3/4 c. mashed bananas (this was about 2 bananas for me)

Preheat oven to 400 degrees. Grease 12 standard muffin cups, or line with paper cups; set aside.

Combine dry ingredients and set aside.

Combine wet ingredients and add all at once to dry ingredients. Stir until just moistened and spoon into prepared muffin cups, filling each 2/3 full.

Bake 18-20 minutes or until toothpick comes out clean.

Streusel Topping:
Combine 3 Tbsp. flour, 3 Tbsp. brown sugar, and 1/4 tsp. of cinnamon. Cut in 2 Tbsp. of butter until mixture resembles coarse crumbs. (2 Tbsp. of chopped nuts is optional) Sprinkle over prepared muffins before baking.

This recipe is courtesy of the Better Homes and Gardens Cookbook. Enjoy!

Friday, June 26, 2009

White Bread

Before Paige was born, I had gotten pretty good at always having homemade bread around; it's so much better than that store-bought stuff! But, alas, she came along and threw things off track for a bit. Today I ran out of Sara Lee and decided that I wasn't buying any more! Usually we prefer wheat bread, but I didn't have enough whole wheat flour on hand, and we're actually waiting to find out if Brandon has Celiac Disease, (in which case we'll be going gluten-free) so I didn't want to run out and stock up. If you like white bread, this is a pretty good recipe. The following post is an older one that I hadn't published previously for wheat bread if you'd prefer.

5-6 c. all-purpose flour
3 Tbsp. sugar
2 t. salt
2 pkg. active dry yeast, (4 1/2 tsp.)
2 c. water
1/4 c. oil or shortening
1 Tbsp. margarine or butter, melted

Combine 2 c. flour, sugar, salt, and yeast; blend well. In a small saucepan, heat water and oil to 120-130 degrees. Add warm water to flour mixture. Blend at low speed until moistened; beat 3 min. at medium speed. By hand, stir in an additional 2 1/2 to 3 c. flour until dough pulls cleanly away from sides of bowl, (I use a wooden spoon, but I know a lot of people actually do this with their hands).

On a floured surface, knead in 1/2 to 1 c. flour until dough is sooth and elastic, about 5 min. Place dough in greased bowl; cover loosely with plastic wrap and a towel. Let rise until doubled about 45-60 min.

Grease two 8x4 or two 9x5 in. loaf pans. Punch down dough and divide into 2 parts. Shape into loaves and place in greased pans. Cover, and let rise until dough fills pans and tops of loaves are about 1 in. above pan edges; 30-35 min.

Heat oven to 375 degrees. Uncover dough and bake 40-50 min. or until loaves sound hollow when lightly tapped. Immediately remove from pans; cool on wire racks. Brush with melted butter.

This recipe is courtesy of the Pillsbury Complete Book of Baking.

Wheat Bread

So, I decided that in an effort to be a better mother and wife, (my husband LOVES homemade bread, and he takes such good care of me that he deserves it!) and to have more nutritious food around for my family, that I would venture out into the world of bread-baking. To be honest, the reason I had never done it before was because I was intimidated! Everyone makes it sound like an art that has to be perfected over time. It just sounded plain exhausting. But I thought I better give it a go, so I pulled out my Pillsbury Complete Book of Baking and tried this recipe. It turned out fabulous the first time! And it seemed so easy! Now, I'm not saying that those who make this an art form can't make better, but for a busy mom, I think this is more than good enough for now. My husband loved it!! He's quite picky about homemade bread, because he doesn't like the "yeasty" taste that some breads have, but this bread had great flavor.
So here's the recipe:
2 pkg. active dry yeast, (one package is about 2 1/4 tsp.)
1/4 c. warm water
1/2 c. firmly packed brown sugar or honey
3 tsp. salt
2 1/2 c. hot water
1/4 c. butter
4 1/2 c. whole wheat flour
2 3/4 to 3 3/4 c. all purpose flour

In a small bowl, dissolve yeast in warm water, (105 to 115 degrees). In a large bowl, combine brown sugar, salt, hot water and butter; cool slightly. To cooled mixture, add 3 c. whole wheat flour. Blend at low speed until moistened; beat 3 minutes at medium speed. Add remaining whole wheat flour and dissolved yeast; mix well. By hand, stir in an additional 2 1/4 to 2 3/4 cups all purpose flour until dough pulls cleanly away from sides of bowl.

On floured surface, knead in 1/2 to 1 c. all purpose flour until dough is smooth and elastic, about 10-15 minutes. Place dough in greased bowl; cover loosely with plastic wrap and cloth towel. Let rise in warm place until light and doubled in size, about 30-45 min.

Generously grease two 8x4 or 9x5, (I used 9x5) loaf pans. Punch dough down several times to remove all air bubbles. Divide dough into 2 parts; shape into loaves. Place in greased pans. Cover; let rise in warm place until light and doubled in size, about 30-45 min.

Heat oven to 375 degrees. Uncover dough. Bake 30 min. Reduce oven temperature to 350 degrees, and bake an additional 10-15 min. or until loaves sound hollow when lightly tapped. Immediately remove from pans; cool on wire racks.

A few things I learned; I read a few chapters from The Bread Bible by Rose Levy Beranbaum, and while I don't pretend to understand most of what she said, (and her recipes were definitely above my level!) I picked up a few things that helped.

1. Kneading too much flour into the dough is a no-no, (you're supposed to try and stay toward the lower end of the measurements given) and it's tempting when that stuff is sticking to your hands! So instead of coating my hands and the counter with flour, and adding more every time it felt sticky, I coated the counter and my hands with cooking spray, and just reapplied every time I felt the need to add more flour. This definitely made the dough easier to handle, and it was perfectly "smooth and elastic" without using the full amount of flour.
2. Also, if I understood correctly, the temperature at which the bread rises has more to do with the actual temperature of the bread, not the room. She recommended a slower rise than a faster one, because the longer the yeast has to do it's job, the more it will get used up and the better the bread will taste, without that yeasty tang. The yeast and action of the kneading already heat up your dough to about 75 degrees. Before I read this, I had tried another recipe and was all worried about the fact that my kitchen was only about 70 degrees, and the recipe said that it needed to rise, "in a warm place, about 80-85 degrees". A tip given was to heat the oven to 400, let it stay there for one minute, turn it off and then put your bread in to rise. Needless to say, my bread rose too fast and too much and I didn't know how to salvage it. Rose suggests that merely turning on your oven light creates enough warmth for the bread to rise, and I actually just let this batch rise on the counter, and it still rose in the said amount of time with no problems. Don't roast yourself out trying to get your bread to rise. Time will do it.
3. (This tip is complements of my Pillsbury cookbook, as are those that follow) For bread that starts to brown too quickly on top, cover with foil during baking, (I always have this problem, is my oven too hot, or are my pans too cheap?)
4. Butter brushed on the bread immediately after baking makes a deliciously yummy soft crust.
5. And finally for those of you amateur bread makers like me that have no idea how to tell if the dough has doubled, poke your fingers in, (lightly!) and the indentation will remain without springing back.
That's my two cents, any other tips from more seasoned bread makers?